Recent Posts
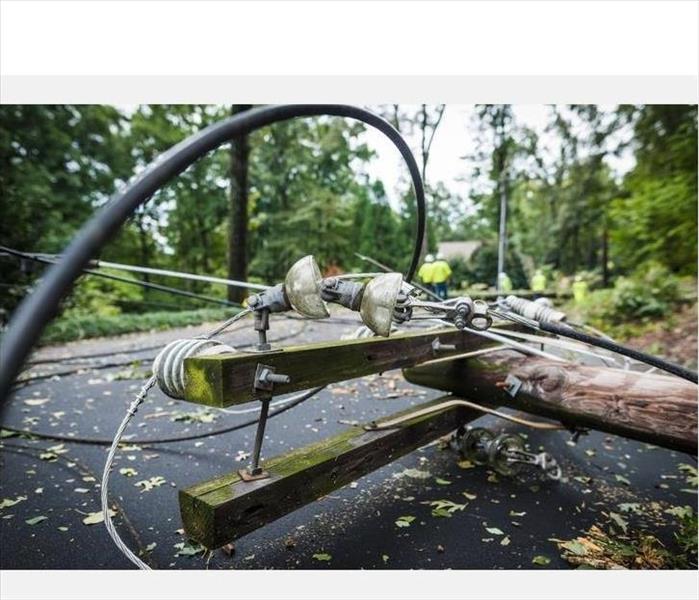
The Role of SERVPRO in Storm Damage Restoration
9/14/2023 (Permalink)
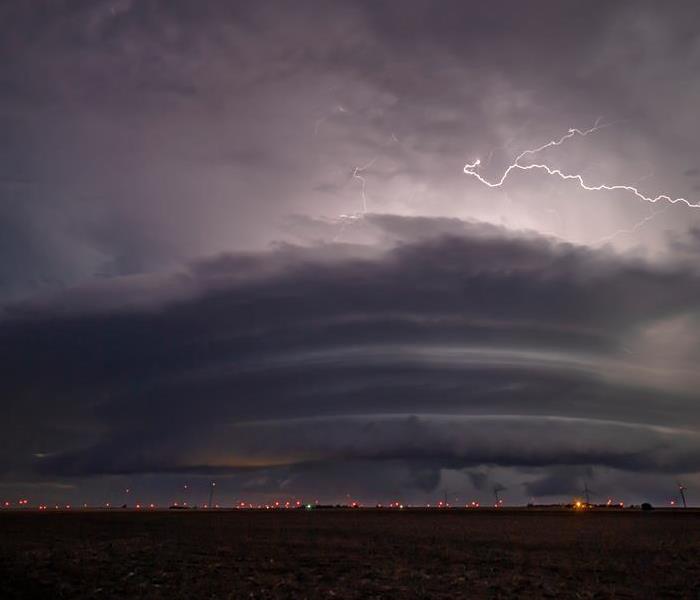 Take protective measures to help protect your home and business from storm and water damage.
When severe weather strikes, it can leave a trail of destruction in its wake. Storms, hurricanes, and floods can wreak havoc on homes and businesses, causing extensive damage that requires immediate attention. In these challenging times, one company that plays a crucial role in storm damage restoration is SERVPRO. With their expertise, resources, and specialized equipment, SERVPRO is at the forefront of helping communities recover and rebuild after a storm. In this blog post, we will explore the vital role that SERVPRO plays in storm damage restoration and the benefits they provide.
Rapid Response and Emergency Services
After a storm, time is of the essence. The longer the damage goes unaddressed, the more extensive and costly the repairs become. SERVPRO understands the urgency and provides a rapid response to storm-affected areas. With their 24/7 emergency services, they can quickly assess the damage, develop a plan, and begin the restoration process immediately. Their swift action helps prevent further damage and accelerates the recovery process.
Expertise and Experience
Storm damage restoration requires specialized knowledge and experience. SERVPRO has a team of highly trained professionals who are equipped with the expertise to handle all aspects of storm damage restoration. They understand the complexities of water damage, mold remediation, structural repair, and content restoration. With their years of experience, they can effectively navigate the restoration process to bring your property back to its pre-storm condition.
Comprehensive Restoration Services
SERVPRO offers a wide range of storm damage restoration services tailored to the specific needs of each situation. From water extraction and drying to structural repairs and content cleaning, they provide a comprehensive approach to restoration. Their team utilizes advanced techniques, equipment, and industry-approved methods to ensure thorough and efficient restoration. Whether it's removing debris, mitigating water damage, or restoring damaged items, SERVPRO has the expertise and resources to handle it all.
Collaboration with Insurance Companies
Navigating the insurance claims process can be daunting, especially during a stressful time like storm damage restoration. SERVPRO has established relationships with numerous insurance companies and can help streamline the claims process. Their professionals are well-versed in insurance policies and documentation requirements, ensuring that the restoration process aligns with insurance guidelines. This collaboration saves you time, reduces administrative burdens, and facilitates a smoother and more efficient restoration process.
Commitment to Customer Satisfaction
SERVPRO's primary focus is on customer satisfaction. They understand that storm damage can be overwhelming, and their goal is to provide peace of mind throughout the restoration process. From the initial assessment to the final stages of restoration, they communicate with transparency, provide progress updates, and address any concerns or questions you may have. Their commitment to exceptional customer service ensures that you feel supported and confident in the restoration of your property.
When it comes to storm damage restoration, SERVPRO is a trusted partner in helping communities recover from natural disasters. Their rapid response, expertise, comprehensive services, collaboration with insurance companies, and commitment to customer satisfaction set them apart in the industry. Whether it's water damage, structural repairs, or content restoration, SERVPRO's dedicated team is there to restore your property and help you rebuild and recover after a storm.
Cleaning Your New Home After Purchasing from Smokers
8/15/2023 (Permalink)
Buying a new home is an exciting milestone, but if the previous owners were smokers, there may be some unpleasant odors and residue left behind. Cleaning a home that has been occupied by smokers requires thoroughness and attention to detail. In this blog post, we will guide you through the process of effectively cleaning your new home and eliminating any lingering smoke-related issues.
Assess the Situation
Before diving into the cleaning process, take a walk through the house to assess the extent of the smoke damage. Pay close attention to areas like walls, ceilings, carpets, curtains, furniture, and ventilation systems, as these are common places where smoke residue can accumulate.
Begin the cleaning process by opening all windows and letting fresh air circulate throughout the house. This will help dissipate the smoke odor and improve air quality.
Clean Surfaces
Start by dusting and wiping down all surfaces in the home. Use a mixture of warm water and mild detergent to clean walls, ceilings, cabinets, and countertops. Don't forget to clean light fixtures, blinds, and window sills as well. If necessary, repeat this step to ensure that any residual smoke residue is completely removed.
Smoke odors tend to cling to carpets and upholstery, so deep cleaning is essential. Consider renting a carpet cleaner or hiring professionals to steam clean all carpets. For upholstery, use a fabric-safe cleaner or consult with a professional upholstery cleaning service.
Treat Floors and Hard Surfaces
Smoke residue can settle on hard surfaces such as hardwood, tile, or laminate floors. Use a floor cleaner appropriate for the specific surface to remove any remaining residue. Pay close attention to corners and crevices, as these areas can trap smoke particles.
If any drapes, curtains, or other washable fabric items are left behind, be sure to launder or dry clean them. This will help eliminate any smoke odors that may be present. Also, consider washing or dry cleaning any clothing left in closets or drawers.
Replace Filters and Clean Ventilation Systems
HVAC systems and air ducts can harbor smoke odors and residue. Replace the filters in your heating and cooling systems to improve indoor air quality. Consider hiring professionals to clean and inspect the air ducts to ensure any smoke particles are removed.
To eliminate smoke odors, use odor neutralizers or deodorizing products specifically designed for smoke remediation. Place these products strategically throughout the house, paying extra attention to areas with persistent odors.
For stubborn smoke odors that persist even after cleaning, consider repainting the walls and applying a sealant. This will help lock in any remaining odors and prevent them from permeating through the fresh paint.
If the smoke damage is extensive or you are unsure how to proceed, it's best to consult professional smoke remediation experts. They have the specialized knowledge and equipment to thoroughly clean and restore your home. Cleaning a home that was previously occupied by smokers requires time, effort, and attention to detail. By following these steps and being thorough in your cleaning process, you can effectively remove smoke residue, eliminate odors, and create a fresh and inviting living space in your new home. Remember, if the task seems overwhelming, it's always a good idea to seek the assistance of professionals who specialize in smoke remediation.
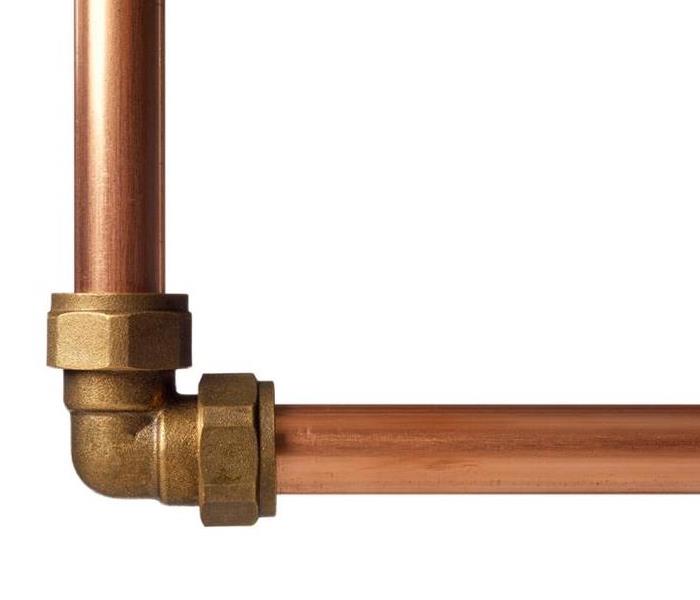
Can Drain Cleaner Damage Pipes?
7/27/2023 (Permalink)
Clogged drains can be a frustrating issue in any household or commercial property. When faced with a stubborn clog, many people turn to drain cleaners as a quick and convenient solution. While drain cleaners can effectively dissolve blockages, there are concerns about their potential impact on pipes. In this blog post, we will delve into the topic of whether drain cleaners can damage pipes and explore the associated risks.
Understanding Drain Cleaners
Drain cleaners are chemical-based products designed to break down and dissolve organic matter, grease, hair, and other substances that cause clogs in drains. They are available in two main types: caustic drain cleaners and acidic drain cleaners. Caustic drain cleaners typically contain substances like sodium hydroxide or potassium hydroxide, while acidic drain cleaners feature ingredients like sulfuric acid or hydrochloric acid.
The Potential Risks to Pipes
Corrosion: Some drain cleaners, particularly acidic ones, can be corrosive to certain types of pipes. Older, corroded pipes made of materials like galvanized steel or copper may be more vulnerable to damage. Prolonged or frequent exposure to corrosive drain cleaners can weaken pipes, leading to leaks or even pipe failure over time.
PVC Pipe Damage: PVC pipes are commonly used in modern plumbing systems due to their affordability and durability. However, certain types of drain cleaners, especially those containing high concentrations of chemicals, can cause PVC pipes to soften, warp, or even dissolve. This can result in extensive damage to the pipes and the need for costly repairs or replacements.
Health and Environmental Concerns: Drain cleaners contain strong chemicals that can be harmful if mishandled or if their fumes are inhaled. Improper use or mixing of drain cleaners can result in dangerous reactions. Additionally, when drain cleaner residue enters the wastewater system, it can have negative environmental impacts, affecting water quality and aquatic life.
Precautions and Alternatives
Read and Follow Instructions: When using drain cleaners, carefully read and follow the instructions provided by the manufacturer. Pay attention to recommended usage amounts, contact time, and safety precautions. Never exceed the recommended dosage, as it can increase the risk of pipe damage.
Consider Mechanical Methods: Instead of relying solely on chemical drain cleaners, consider using mechanical methods to clear clogs. Tools such as plungers, drain snakes, or augers can often effectively remove blockages without the need for harsh chemicals. These methods are generally safer for your pipes and the environment.
Seek Professional Help: For persistent or complex clogs, it is advisable to consult a professional plumber. They have the expertise and tools to address the issue safely and effectively. Professional plumbers can utilize techniques like hydro jetting or pipe inspection cameras to clear clogs without resorting to potentially damaging drain cleaners.
Preventive Measures: Regular maintenance and prevention are key to avoiding clogged drains. Implement practices like using drain covers to catch debris, avoiding pouring grease down the drain, and periodically flushing drains with hot water or a mixture of vinegar and baking soda to help keep them clear.
While drain cleaners can be effective in unclogging drains, they do come with potential risks to your pipes and the environment. The corrosive nature of certain drain cleaners can damage pipes, particularly older or PVC pipes. It's essential to exercise caution when using these products and consider alternative methods whenever possible. By being mindful of proper usage, exploring mechanical solutions, and seeking professional assistance when needed, you can effectively maintain your pipes' integrity and keep your plumbing system in good condition for the long term.
Beyond Sandbags: Exploring Alternative Flood Protection Methods
6/6/2023 (Permalink)
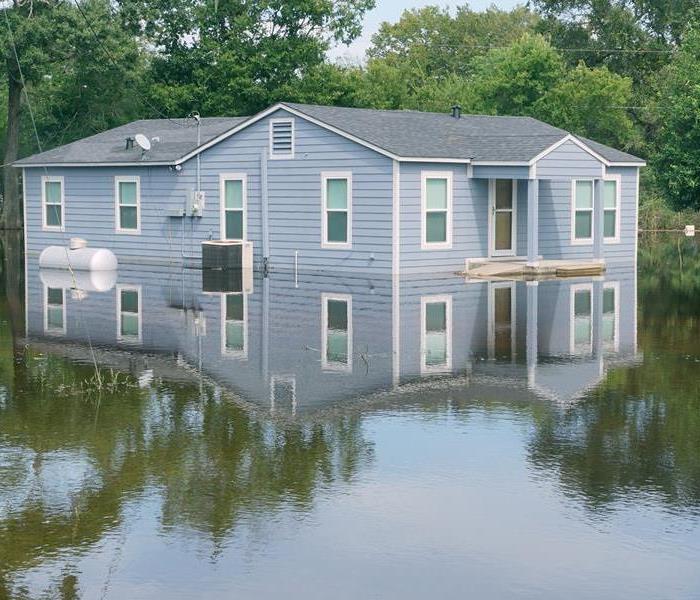 When your home suffers from a flood, there are many alternatives to sandbags to protect your property from flooding.
Sandbags have long been a traditional way to protect homes and businesses from floodwaters. However, sandbagging can be time-consuming, labor-intensive, and may not always be effective. Fortunately, there are alternatives to sandbagging that can provide effective flood protection. In this blog, we'll explore some of the most popular alternatives to sandbagging and discuss their benefits.
Flood Barriers
Flood barriers are a popular alternative to sandbags. These barriers are made of lightweight, flexible materials, such as PVC or rubber, and are designed to be easily deployed in the event of a flood. Flood barriers are typically easy to install, require little maintenance, and can be reused multiple times.
Water-filled Barriers
Water-filled barriers are similar to flood barriers, but instead of being filled with sand or another heavy material, they are filled with water. These barriers are typically made of durable, puncture-resistant materials and can be easily transported and deployed in the event of a flood. Water-filled barriers can be an effective alternative to sandbags, as they can be quickly and easily installed and removed.
Flood Gates
Flood gates are designed to protect against rising floodwaters by creating a barrier across doorways and other openings. These gates can be made of a variety of materials, including aluminum, steel, and PVC, and can be easily installed and removed. Flood gates can be an effective way to protect homes and businesses from flooding, especially in areas where sandbagging is not practical.
Flood Panels
Flood panels are designed to cover openings such as doors, windows, and vents. These panels can be made of a variety of materials, including aluminum, steel, and polycarbonate, and can be easily installed and removed. Flood panels are an effective way to protect against floodwaters and can be a good alternative to sandbags in areas where flooding is a common occurrence.
Inflatable Dams
Inflatable dams are designed to be quickly inflated in the event of a flood. These dams can be made of a variety of materials, including rubber and PVC, and can be easily transported and deployed. Inflatable dams are an effective way to protect homes and businesses from flooding, especially in areas where sandbagging is not practical.
Sandbags have long been a traditional way to protect homes and businesses from floodwaters. However, sandbagging can be time-consuming, labor-intensive, and may not always be effective. Fortunately, there are several alternatives to sandbagging that can provide effective flood protection. Flood barriers, water-filled barriers, flood gates, flood panels, and inflatable dams are all effective ways to protect against floodwaters. If you live in an area that is prone to flooding, consider these alternatives to sandbagging to protect your property and belongings.
Mold Home Testing Kits: How Accurate Are They?
5/22/2023 (Permalink)
 Proper mold testing and remediation should always be done by qualified and experienced professionals.
Mold is a common issue that can occur in homes and can pose serious risks to the structure. One way to determine the presence of mold in your home is by using a mold home testing kit. These kits are readily available in stores and online, and they claim to provide accurate results. However, it's important to understand the limitations and accuracy of these testing kits before relying solely on their results. In this blog, we will explore how accurate mold home testing kits are and what factors to consider when using them.
Understanding Mold Home Testing Kits
Mold home testing kits typically come with instructions and components for collecting samples from suspected mold-infested areas in your home. The samples are then sent to a laboratory for analysis. The laboratory will provide results indicating the type and concentration of mold present in the samples.
There are two main types of mold home testing kits: surface testing kits and air testing kits. Surface testing kits involve swabbing or tape-lifting samples from surfaces with visible mold growth. Air testing kits involve collecting air samples from the indoor environment to measure the concentration of mold spores in the air.
Factors Affecting Accuracy
Sample Collection: The accuracy of mold home testing kits largely depends on the proper collection of samples. If samples are not collected correctly or from the appropriate areas, the results may not be accurate. It's crucial to follow the instructions provided with the kit carefully and collect samples from areas with visible mold growth or areas where mold is suspected.
Mold Types: Mold home testing kits may not be able to accurately identify all types of mold. Some kits may only detect certain common types of mold, while others may not detect less common or hidden mold species. The accuracy of the results also depends on the sensitivity of the testing method used in the laboratory.
Mold Concentration: The concentration of mold in the samples can also affect the accuracy of the results. Mold home testing kits may provide a rough estimate of mold concentration, but they may not provide precise measurements. The concentration of mold can vary depending on factors such as the location, time of day, and weather conditions.
Laboratory Analysis: The accuracy of mold home testing kits also depends on the quality and reliability of the laboratory performing the analysis. Not all laboratories may use the same testing methods or have the same level of expertise in mold analysis. It's essential to choose a reputable laboratory for accurate results.
False Positives or Negatives: Mold home testing kits may also produce false positives or false negatives. False positives occur when the kit detects mold even if there is no significant mold growth, while false negatives occur when the kit fails to detect mold even if it is present. These inaccuracies can lead to unnecessary worries or overlooking a mold problem.
Mold home testing kits can be a convenient tool for detecting the presence of mold in your home, but their accuracy may vary depending on various factors. It's important to use these kits as a preliminary screening tool and not solely rely on their results. If you suspect a mold problem, it's best to consult with a professional mold inspector or remediation company for a comprehensive assessment and accurate results. Proper mold testing and remediation should always be done by qualified and experienced professionals to ensure the safety of your home and its occupants.
8 Essential Steps to Take When Filing a Fire Insurance Claim
4/12/2023 (Permalink)
 File an insurance claim when your property suffers from a fire loss.
Fire insurance is the most basic type of property insurance. It covers your home, its contents and any other structures on your property from fire damage. Fire insurance also protects against lightning strikes and other natural disasters that can cause fires such as floods or earthquakes.
You should have fire insurance because a house fire can be devastating to your finances and emotional wellbeing.
Filing an accurate claim helps ensure that insurers stay honest about paying out claims fairly when people need them most.
Step 1: Gather Information
The first step in filing a claim is to gather all of the documentation related to your insurance policy, including:
- Contact information for your insurance company and agent.
- The name of your policyholder and any other people covered by the policy (if applicable).
- Documentation of the fire itself, such as photographs or video footage taken at the scene, as well as receipts or invoices for repairs made after the incident.
Step 2: Contact Your Insurance Company
The next step is to contact your insurance company and let them know about the fire. This can be done by calling their toll-free number, emailing or visiting their website. Provide them with all of the information you gathered in step 1 so they can process your claim quickly and accurately.
Step 3: Schedule an Inspection
The next step in the process is to schedule an inspection with your insurance adjuster. This will involve providing them with information gathered in step 1, as well as allowing them access to the site of your fire damage so they can assess its extent and determine if it qualifies for coverage under your policy.
If you need help scheduling this appointment, contact us today!
Step 4: Prepare an Inventory
The next step is to prepare an inventory of all items damaged or destroyed in the fire. This includes make, model, serial numbers and estimated value.
Step 5: File the Claim
After you've gathered all the information you need, it's time to file the claim.
The first step is submitting your claim to your insurance company. You can do this by phone or online; either way, make sure that any supporting documents are attached before submitting them. Include:
A detailed description of what was lost in the fire (for example, "a 40-inch flat-screen TV")
An inspection report from an approved third party who has inspected and assessed damages caused by the fire (this will help determine how much money they will pay out)
An inventory list detailing everything that was damaged or destroyed as a result of this incident
Step 6: Wait for Approval
Once you've filed your claim, the insurance company will review it and decide whether or not to approve it. This process can take anywhere from a few days to several weeks. If the claim is approved, you'll be notified by mail or email that your check is on its way.
If the company doesn't approve your claim right away, don't panic! They may require additional information or documentation before making a decision about whether or not they will pay out any money for damages caused by fire damage at home or business premises.
Step 7: Receive Payment
Once you have submitted your claim, it is important to be patient. The insurance company will review the documentation and make a decision about whether or not your claim is valid. This process can take several weeks, so don't worry if you don't hear back right away. Once they approve your claim, they will send payment for the damages caused by the fire.
Step 8: Make Repairs
Once the payment is received, you can use the money to make the necessary repairs to your property. If you don't know how much it will cost, ask an insurance agent or contractor. They can help you figure out what needs fixing and how much it will cost before making a claim.
5 Steps to Take If Your Dishwasher Leaks: A Guide to Fixing the Issue
3/11/2023 (Permalink)
 Leaking dishwashers are a common problem that can leave your kitchen with a water loss.
A dishwasher is a modern-day convenience that saves us a lot of time and effort in the kitchen. However, like any other appliance, it can encounter problems from time to time. One of the most common issues that a dishwasher can face is leakage. A leaking dishwasher can cause water damage to your kitchen floor, cabinets, and even the walls. Therefore, it is essential to address the issue as soon as possible. Here are some steps to follow if your dishwasher leaks.
Turn off the power and water supply
The first step is to turn off the power and water supply to your dishwasher. You can do this by turning off the circuit breaker that powers your dishwasher or unplugging it from the wall socket. Also, turn off the water supply valve that connects to your dishwasher. This will prevent any further damage and keep you safe while you try to fix the issue.
Identify the source of the leak
The next step is to identify the source of the leak. Check the dishwasher's door seal, pump, hoses, and valves for any cracks, holes, or loose connections. If you cannot identify the source of the leak, it is best to call a professional plumber or appliance repair technician to help you.
Clean up the water
Once you have identified the source of the leak, you need to clean up the water. Use a mop or towels to soak up the water on the floor and around the dishwasher. If the water has seeped into the cabinets or walls, use a dehumidifier to dry the area thoroughly.
Fix the issue
If the leak is due to a loose connection, tighten it. If there is a crack or hole, replace the damaged part. In some cases, the issue may be with the door seal or the pump, and you may need to replace them. If you are not confident in fixing the issue yourself, it is best to call a professional.
Test the dishwasher
Once you have fixed the issue, test the dishwasher to ensure that it is working correctly. Run a cycle to see if there are any leaks. If the problem persists, it may be a more significant issue that requires professional attention.
In conclusion, a leaking dishwasher is a common problem that can cause water damage to your kitchen. By following the steps above, you can identify the source of the leak and fix the issue. If you are not confident in fixing the problem yourself, it is best to call a professional to avoid causing further damage. Remember to always turn off the power and water supply before attempting any repairs.
Flood insurance - Do I really need it?
2/13/2023 (Permalink)
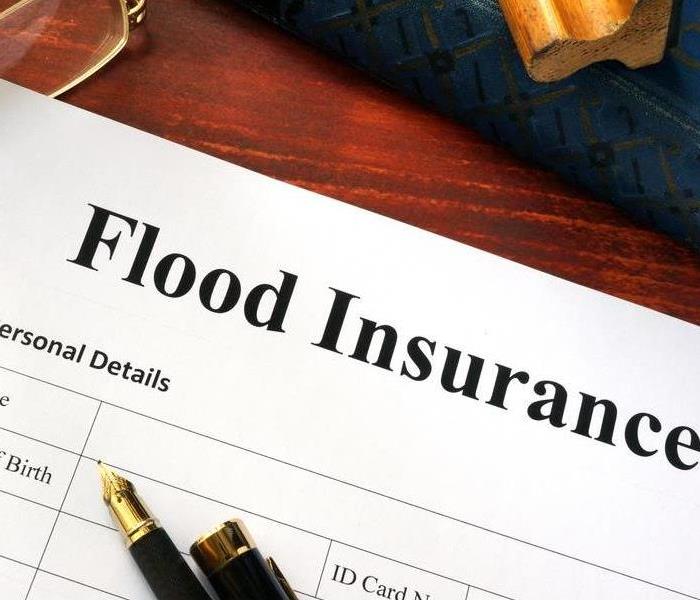 If you live in a flood zone, give SERVPRO a call today after a rain storm
Flood insurance is a type of coverage that you can purchase alongside your regular homeowner's policy. It helps protect against damage from flooding, which can be very costly due to the amount of water involved and the potential for mold growth in your home. Flooding occurs when stormwater, sewage or other fluids are pushed into homes by rain or melting snow.
Flood insurance is not required by law.
Flood insurance is not required by law, so you're free to buy it or not. However, if you live in a flood-prone area and your home is at risk of flooding, it's probably worth considering purchasing coverage so that you don't have to pay for damage out of pocket.
The required amount of coverage depends on where you live. The National Flood Insurance Program (NFIP) requires homeowners in designated high-risk areas to carry flood insurance, other residents may be able to purchase coverage through their homeowners insurance policies or private companies with whom they do business.
Flood Zones
Flood zones are designated areas where flooding occurs regularly and frequently. The Federal Emergency Management Agency (FEMA) identifies these areas using data from the National Flood Insurance Program (NFIP).
If you live near a dam or lake and have been told by local authorities that there is potential for water release from the dam/lake, then it is recommended that homeowners purchase additional coverage through their existing homeowner's policy or through an optional rider on their homeowner's policy called "risks not otherwise covered."
Two types of Floods
There are two types of floods: "100-year" events and "500-year" events--and this has nothing to do with how often they occur! A 100-year event means it has occurred once every 100 years over time; whereas a 500-year event means it has only happened once every 500 years over time.
Your best bet is to talk to your insurance agent about whether you need flood insurance and how much it might cost you.
Questions to Ask
There are many questions to ask when considering Flood Insurance such as:
- What kind of coverage do I have? Is it enough?
- How much does it cost? What are my deductibles and premiums, if any? Do they vary based on location or other factors (like how high my home sits above sea level)?
- Does my policy cover all types of flooding, or just certain types like storm surge or riverine flooding; how does this affect my premium costs because some types are more common than others in different parts of the country; what is excluded from coverage under this type of policy; am I eligible for any discounts available through NFIP programs such as Preferred Risk Policyholder Program (PRP)
If you live in a flood zone, above a dam or lake, or near a river, you should strongly consider buying flood insurance. It's not required by law and most homeowners policies don't cover flood damage. If you have a home that is effected by flooding, you could potentially spend thousands of dollars out of pocket that insurance could have covered. You may also want to talk with an agent about whether or not this type of coverage makes sense for your situation
How To Prepare For Days Without Power
12/9/2022 (Permalink)
 During the winter, power outages are an increased risk.
How to Get Ready for Power Outages
During the winter, power outages are an increased risk. Ice on power lines, snapping trees, and more can break or down power lines and render your area without electricity for a time. Here’s how to prepare!
Store drinking water and food
If you're going to be without power for an extended amount of time, you'll want to make sure your water supply is stocked up. Storing drinking water in plastic bottles is a great way to ensure that it stays clean and safe. You can also store food in plastic containers or bags so that it will stay fresh longer—just make sure those containers are sealed tightly before storing them away!
When deciding what food items will be best suited for storage, consider canned goods (with airtight lids) as well as non-perishable foods like dried fruit or boxed cereals with no added sugar or preservatives. It's also wise to keep an eye out on expiration dates: if anything looks like it might not last another year after being opened, throw it out before the power goes out!
Turn off or disconnect appliances, equipment, or electronics.
Turn off the gas supply to your home. The next step would be turning off the electricity supply to your home. After that, switch off the propane supply at its source in case there are leaks in pipelines or tanks with no pressure relief valves.
Take care of your pets.
Taking care of your pet is a big task. The first thing you must do is make sure that they are safe and comfortable during power outages. Cats, for example, may get freaked out by the dark and will run away if they can't find their way around; dogs may become aggressive or destructive if they're bored or upset. Here are some tips:
- Make sure your pet has plenty of water.
- Make sure your pet has access to shelter from hot temperatures or cold weather conditions.
Prepare to stay cool – or warm.
If you live in an area that is prone to extreme weather, be sure to prepare for the worst. If your home has natural gas service and your area experiences a heat wave, turn off the pilot light on your heater and make sure all gas appliances are turned off, so they don't spark a fire when electric service returns. Similarly, if you have air conditioning during a cold snap, make sure that it is off before electricity is restored so as not to cause any damage or leaks.
Have enough blankets (and maybe even an extra sleeping bag) ready in case temps drop below freezing at night; remember that wearing layers will help keep your body heat regulated too!
Never use a gas stovetop or oven to heat your home.
If you have a gas stovetop or oven, never use it to heat your home. This is because any open flame can be dangerous and should be avoided. If you don’t have a portable generator, consider using a portable heater instead.
You should get things to prepare for a possible power outage
To prepare for a potential power outage, you need to have a plan in place. You should start by making sure you have plenty of batteries on hand. Have some candles and flashlights as well in case the power goes out at night.
With these things in place, there are steps you can take if the power does go out:
- If there is no immediate danger (like in the event of an earthquake), stay inside your home or building until officials tell people that it's safe to leave their homes. Do not try to walk around outside unless absolutely necessary!
- If there is immediate danger (like during a hurricane), find shelter immediately and stay there until officials tell people it's safe to leave shelter. Make sure everyone knows how they are getting home after school or work, so they don't get separated from each other if anything happens while traveling back home.
Conclusion
Whether you’re preparing for an upcoming storm or just want to be prepared in case of an emergency, these tips will help you prepare your Bloomingdale, IL home and family for a power outage.
How To Properly Snake a Clogged Pipe
11/12/2022 (Permalink)
 The main benefit of using a pipe snake is that they are much easier to use.
How to Snake a Pipe
Don't panic, even if you don't know the first thing about plumbing, it's easy to learn how to snake a pipe. A snake is just a metal coil that can be inserted into your pipes and then turned to push debris further down the line. Once any debris has been cleared out of the way, you can use your faucet again. Here's what you need.
Go to the hardware store and get a pipe snake (this is just a metal coil you can feed down your pipes).
A pipe snake is a metal coil that you can feed down your pipes, much like a snake. They're relatively inexpensive and should be available at your local hardware store, but if you don't have one on hand, it's worth going out to buy one for this situation.
If you've got yourself a pipe snake, all you need to do is feed the metal coil down the pipe until it reaches where the clog is located. Then, pull back on the handle of your tool while pushing forward on it at the same time (this will allow the clog to pass through).
The main benefit of using a pipe snake over something like drain cleaner (which can damage your plumbing) or plunging (which requires special equipment) is that they are much easier to use and require no special training or skill level whatsoever.
Put the snake into the pipe and turn its handle.
This can be done in a few different ways, but they all involve inserting the end of the snake into your drain opening until you've reached its maximum length. Then, turn its handle clockwise and feed it down as far as possible.
Once you've reached that point, turn your attention to turning off any valves or water sources nearby so that everything can drain completely. If there isn't a valve in sight and all you have is cold water coming out of your taps, try flushing them out with warm water from a bucket before draining them at full blast through all their outlets.
Insert it about a foot at first, then keep adding more as you move it down.
The first thing you need to do is insert the snake into your drain, but not too far. The idea here is that you want enough of the snake inside so that when you pull on it, it doesn't fall all the way out of your drain. The next step is to gently push down on your plunger and push as much water down your drain as possible. After this has been done, place more of the snake into your pipe until about three feet of it has gone in there. Now pull up slightly on the snake before pushing back down again with more force than before; this will cause even more water from inside where clogs occur to come out through another opening within your pipes. Repeat these steps until no more debris comes out or until it feels like nothing else could possibly be left behind (if there isn't any improvement at all after following these steps).
Keep adding more until the water runs freely.
If you're still not getting any results, it might be time to try a different type of snake. If you have a toilet drain clogged with paper towels and Kleenex, the best tool to use will be one designed for plumbing pipes. But if you're trying to clear out tree roots—the culprit behind most drain clogs in residential drains—you may want to reach for a larger diameter snake designed specifically for that purpose.
We hope we've convinced you to give snaking a go. It's easy, quick, and effective—and if you're like us, you'll be glad for another reason to avoid calling a plumber! If it still sounds intimidating, think about what happened when your toilet was clogged: You probably did some research online or asked someone who knows plumbing for advice. If so, this article fits the bill perfectly: It explains how snaking works in simple terms and provides step-by-step instructions on how to do it yourself.


 24/7 Emergency Service